Creating a DR-compliant tunnel on a mobile client
For more information on Stormshield Network VPN Client Exclusive, refer to the Stormshield VPN Client Exclusive v7 administrator guide.
Running and enabling the DR-compliant VPN client
IMPORTANT
To configure the DR-compliant VPN client, you must run it with administrator privileges on the client workstation (right-click on the VPN client icon > Run as administrator).
- On the Windows desktop on the client workstation, run the DR-compliant VPN client.
- The first time it is launched, enter the license number for the user in question.
Allowing the display of additional parameters
- Click on Tools > Options in the general menu.
- In the General tab: select Show more parameters and confirm by clicking on OK.
Creating a new gateway
In the left column of the DR-compliant VPN client:
- Right-click on IKEv2 and select New IKE Auth.
A gateway, named Ikev2Gateway by default, is created. - It can be renamed by right-clicking on this gateway and selecting Rename.
Adapting the gateway's parameters to make it compatible with DR mode
Select the gateway created earlier.
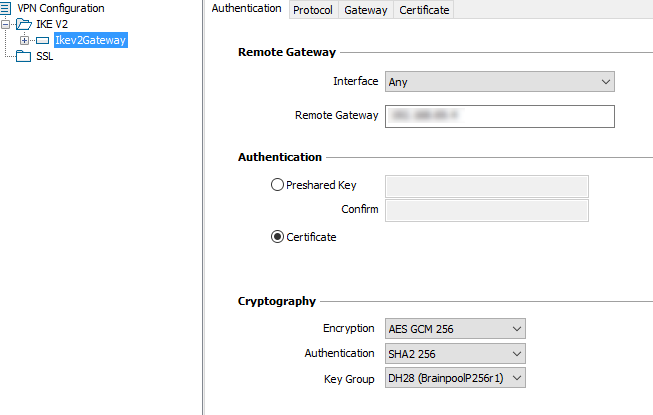
Authentication tab
- In the Remote Gateway field, enter the IP address or FQDN of the firewall with which the DR-compliant tunnel will be set up.
- In the Integrity section, select Certificate.
You will be automatically directed to the Certificate tab. - Click on Import a certificate.
- Select P12 format and click on Next.
- Select the identity of the mobile client that was exported earlier in P12 format on the firewall in question.
- Enter the password that protects this identity.
- Confirm by clicking on OK.
- Click on the Authentication tab again.
- In the Cryptography section, select the values that match those selected for the DR encryption profile on the firewall in question:
- Encryption: AES GCM 256 or AES CTR 256,
- Integrity: SHA2 256,
- Key group: DH28 (BrainpoolP 256r1) or DH19 (ECP 256).
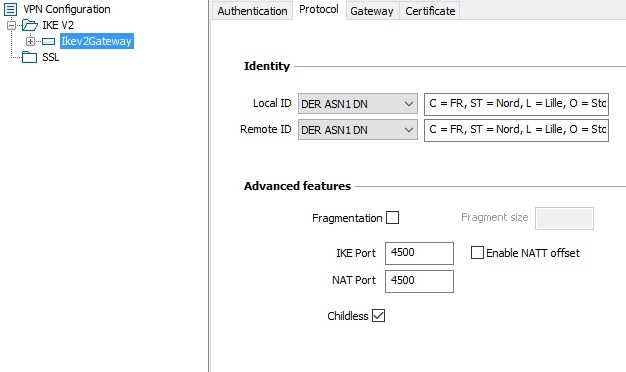
Protocol tab
- In the Identity section, in the Remote ID field: select DER ASN1 DN and indicate the subject of the version 5 SNS firewall gateway certificate (C=FR,ST=Nord,L=Villeneuve d'Ascq,O=Stormshield,OU=Documentation,CN=DR-Compliant-Gateway-Peer.stormshield.eu in this example).
- In the Advanced properties section:
- Set the IKE Port to 4500,
- Select the Childless checkbox.
Gateway tab
You can leave the default settings.
NOTE
For the lifetime setting, it may be helpful to set a value lower than the one configured on the gateway (firewall in DR mode) so that the DR-compliant VPN client initiates phase 2 renegotiations.
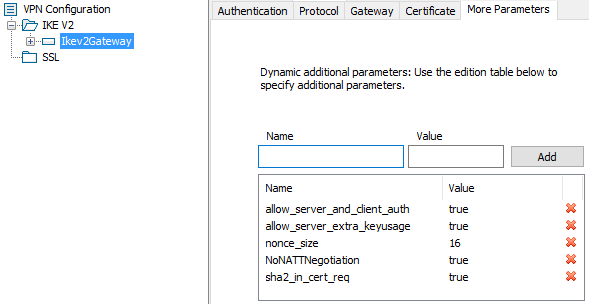
More parameters tab
- If the parameter "Method14_RSASSA_PKCS1" is present, delete it.
- Add the custom parameters with the following values:
| Name | Value |
| nonce_size | 16 |
| NoNATTNegotiation | true |
| sha2_in_cert_req | true |
| allow_server_and_client_auth | true |
| allow_server_extra_keyusage | true |
Saving configurations
Click on Configuration > Save in the general menu of the DR-compliant VPN client to confirm and save the configuration.
Creating the tunnel to the DR-compliant gateway
- Right-click on the gateway that was created earlier and select New Child SA.
A tunnel, named Ikev2Tunnel by default, is created. - It can be renamed by right-clicking on this tunnel and selecting Rename.
Adapting the tunnel's parameters to make it compatible with DR mode
Select the tunnel that was created earlier.
Child SA tab
- Select the checkbox Request configuration from the gateway.
- In the Cryptography section:
- In the Encryption field, select the same value as the one configured for the gateway that was created earlier: AES GCM 256 or AES CTR 256.
- Select auto for the Integrity field.
- In the Diffie-Hellman field, select the same value as the one configured for the gateway that was created earlier: DH28 (BrainpoolP 256r1) or DH19 (ECP 256).
- Select Automatic for the Extended sequence number field.
- In the Lifetime section, select 1800 (seconds) for the Child SA Lifetime field.
Saving configurations
Click on Configuration > Save in the general menu of the VPN client to confirm and save this configuration.